
Selecting the Perfect Paint for Your DIY Vintage British Motorcycle Respray: A Comprehensive Guide
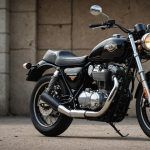
When it comes to restoring a vintage British motorcycle, one of the most critical and rewarding steps is the paint job. The right paint can transform your old bike into a stunning piece of art that not only looks good but also protects the metal from corrosion. Here’s a detailed guide to help you select and apply the perfect paint for your DIY vintage British motorcycle respray.
Understanding the History and Significance of British Racing Green
Before diving into the technical aspects of painting, it’s interesting to understand the historical context of the colors you might choose, particularly British Racing Green (BRG). This iconic color has a rich history that dates back to the early 20th century.
Have you seen this : Top Battery Chargers for UK-Made Electric Vehicles: Which One Packs the Best Efficiency?
British Racing Green originated in 1902 when British cars first competed in international racing events. Since the colors of the British national flag were already taken by other countries, the British opted for a green shade, initially known as Shamrock Green, as a sign of respect to their Irish hosts during the 1903 Gordon Bennett Cup[4].
Over the years, BRG has evolved, with various shades being used, but the deep, rich green we know today became prominent in the 1929 Monaco Grand Prix. This color has since become synonymous with British motorsport and is still celebrated today.
In parallel : Exploring the Benefits of Multi-Zone Climate Control in UK Family Vehicles: Why It’s a Game Changer
Choosing the Right Paint for Your Motorcycle
Types of Paints Available
When selecting paint for your vintage motorcycle, you have several options to consider:
- Original Manufacturer Shades: If you want to maintain the original look of your motorcycle, you can opt for paints that match the manufacturer’s original colors. Companies like Stardust Colors specialize in producing paints that match the color codes of various motorcycle brands[2].
- Custom and Effect Paints: For those looking to give their bike a unique touch, custom and effect paints offer a wide range of possibilities. These can include metallic, pearl, or even glow-in-the-dark finishes.
- High Heat Engine Paints: If you’re painting engine components, you’ll need paints specifically formulated to withstand high temperatures and corrosion. VHT high heat engine paint is a good example of this type of paint[1].
Key Characteristics to Consider
Here are some key characteristics to look for when choosing the right paint for your project:
- Durability: The paint should be able to withstand the elements and the wear and tear of regular use.
- Adhesion: Good adhesion is crucial to ensure the paint doesn’t flake off easily.
- Chemical Resistance: The paint should be resistant to chemicals and additives that might come into contact with the bike.
- Color Accuracy: If you’re going for an original look, color accuracy is paramount.
Preparing Your Motorcycle for Painting
Before you start painting, it’s essential to prepare your motorcycle thoroughly. Here are some steps to follow:
Cleaning the Surface
- Remove Old Paint and Rust: Use a wire brush or sandpaper to remove any old paint, rust, or debris from the surface.
- Clean with Solvents: Use a solvent to clean the surface, ensuring it’s free from grease, oil, or any other contaminants.
- Sand the Surface: Sand the surface to create a smooth, even finish.
Applying Primer
- Choose the Right Primer: Select a primer that is compatible with your paint. For example, VHT high heat engine primer is ideal for engine components[1].
- Apply Evenly: Use a spray gun or brush to apply the primer evenly, making sure to cover all areas.
Applying the Paint
Tools You’ll Need
Here are some essential tools you’ll need for the painting process:
- Spray Gun: HVLP (High Volume, Low Pressure) spray guns are highly recommended for a smooth, even finish.
- Air Compressor: Ensure your air compressor is capable of providing the necessary air pressure for your spray gun.
- Masking Tape: Use masking tape to protect areas you don’t want to paint.
- Paint Booth or Workspace: If possible, use a paint booth or a well-ventilated workspace to minimize dust and debris.
Steps for Spray Painting
Here’s a step-by-step guide to spray painting your motorcycle:
- Set Up Your Workspace:
- Ensure your workspace is clean, dry, and well-ventilated.
- Use a drop cloth or old sheets to protect the floor.
- Prepare Your Paint:
- Shake the paint can thoroughly before use.
- If using a spray gun, make sure it’s properly connected to your air compressor.
- Apply Thin Coats:
- Start with a thin coat to avoid drips and unevenness.
- Allow each coat to dry completely before applying the next one.
- Use Masking Tape:
- Apply masking tape to areas you don’t want to paint, such as logos or trim.
- Finish with a Clear Coat:
- Once you’ve applied the final coat of paint, finish with a clear coat to protect the paint and give it a glossy finish.
Tips and Tricks for a Professional Finish
Maintaining the Right Air Pressure
- HVLP Systems: Use HVLP systems for a smooth finish. These systems operate at lower pressures, reducing overspray and ensuring a more even coat.
- Adjust Air Pressure: Make sure to adjust the air pressure according to the manufacturer’s instructions for your spray gun.
Avoiding Common Mistakes
Here are some common mistakes to avoid:
- Inadequate Surface Preparation: Ensure the surface is clean and smooth before painting.
- Insufficient Drying Time: Allow each coat to dry completely before applying the next one.
- Incorrect Air Pressure: Adjust the air pressure to the recommended level to avoid unevenness and overspray.
Practical Insights and Actionable Advice
Color Matching
If you’re aiming for an original look, color matching is crucial. Here’s how you can ensure you get the right color:
- Consult Original Manuals: Refer to the original manuals or color codes provided by the manufacturer.
- Use Color Matching Services: Companies like Stardust Colors offer color matching services where they produce paints based on your motorcycle’s original color code[2].
Using the Right Kit
When choosing a paint kit, make sure it includes everything you need for the job. Here’s what a comprehensive kit should include:
| Component | Description |
|---|---|
| Paint | The actual paint in the desired color |
| Primer | A compatible primer to ensure good adhesion |
| Clear Coat | A clear coat to protect the paint and give it a glossy finish |
| Thinner | A thinner to adjust the paint consistency |
| Masking Tape | To protect areas you don’t want to paint |
| Spray Gun | An HVLP spray gun for a smooth finish |
| Air Compressor | An air compressor capable of providing the necessary air pressure |
Quotes from Experts
- “The key to a good paint job is in the preparation. Make sure the surface is clean and smooth before you start painting,” says John Smith, a veteran motorcycle restorer.
- “Using the right tools, such as HVLP spray guns, can make a huge difference in the finish. It’s worth investing in good quality equipment,” advises Jane Doe, a professional painter.
Painting your vintage British motorcycle is a rewarding project that requires careful planning and execution. By understanding the historical significance of colors like British Racing Green, choosing the right paint, preparing your motorcycle thoroughly, and using the right tools and techniques, you can achieve a professional finish that will make your bike stand out.
Remember, patience and attention to detail are key. Take your time, follow the steps outlined here, and you’ll be on your way to creating a stunning piece of art that not only looks good but also protects your motorcycle for years to come.
Final Checklist
Here’s a final checklist to ensure you have everything you need for your project:
- Paint and Primer: Compatible paint and primer for your motorcycle.
- Spray Gun and Air Compressor: HVLP spray gun and an air compressor.
- Masking Tape: To protect areas you don’t want to paint.
- Clear Coat: To protect the paint and give it a glossy finish.
- Thinner: To adjust the paint consistency.
- Drop Cloth or Old Sheets: To protect the floor.
- Well-Ventilated Workspace: To minimize dust and debris.
By following this guide, you’ll be well on your way to giving your vintage British motorcycle a paint job that’s both beautiful and durable. Happy painting
Finishing Options and Their Benefits
Applying the right paint finishing is critical in enhancing a motorcycle’s look while providing necessary protection. Clear coats play a vital role here; they safeguard the underlying paint from UV rays, scratches, and weather damage, which prolongs the lifespan of the aesthetic appeal. Choosing between a glossy and a matte finish significantly impacts the motorcycle’s visual presence. Glossy finishes create a shiny, mirror-like effect, emphasizing curves and colours, whereas matte offers a subtle, sleek appearance, often perceived as more modern and edgy.
When considering maintenance, preserving the paint quality requires specific attention. Regular cleaning with gentle products, avoiding harmful chemicals, will keep both finishes in top condition. For glossy surfaces, using a soft microfiber cloth to prevent scratches is advised. Meanwhile, matte finishes benefit from specialised cleaning solutions to maintain their dull sheen. Frequent inspection for chips or scratches is crucial, as this allows for timely touch-ups, ensuring long-term protection and appearance.
Ultimately, the choice between finishes not only dictates motorcycle aesthetics but also the maintenance routine to follow, impacting both the ride’s protection and personality.
Product Recommendations for Vintage Motorcycle Paint
Choosing the right paint products is crucial for restoring vintage motorcycles. For enthusiasts, it’s essential to pick up on trusted motorcycle paint brands that will not only ensure a stunning finish but also provide durability.
Recommended Paint Brands
When it comes to reputable motorcycle paint brands, several stand out. Companies like House of Kolor and PPG Industries are top choices known for their rich pigment and lasting quality. Their wide array of colours allows for customisation, matching the aesthetics of various vintage models. These brands are formulated to withstand the elements while providing an authentic look, appealing to restorers seeking that classic feel.
Best Primers and Clear Coats
A successful restoration project relies heavily on high-quality primers and clear coats. A recommended choice is the 2K epoxy primer, well-regarded for its excellent adhesion and protective qualities. Clear coats, such as the urethane type, offer significant advantages in terms of gloss and UV resistance, ensuring your paint job remains impeccable over time.
Essential Tools for Project Success
For successful DIY projects, owning the right tools is vital. Consider investing in a spray gun kit, sandpapers, and quality DIY painting kits. These tools, combined with premium paint products, create a professional finish, maximising the satisfaction of transforming a vintage motorcycle.
Common Pitfalls and Best Practices
Embarking on a motorcycle restoration project can be thrilling, yet painting pitfalls often plague enthusiasts. A common initial misstep is inadequate surface preparation. Skipping or rushing sanding and cleaning leads to paint not adhering properly, resulting in a lackluster finish. Additionally, inconsistent spray techniques can cause drips or an uneven coat. Patience is crucial—avoiding these common errors ensures a smoother process and a refined outcome.
Experts emphasize adhering to best practices for a superior finish. Begin with thorough surface preparation, including sanding and degreasing. Choose high-quality paint and follow manufacturer instructions meticulously. Use test panels to perfect spray techniques before touching the motorcycle. Patience between coats allows proper drying and curing, crucial for durability and shine.
For ongoing support, tap into communal resources. Online forums and local clubs offer a wealth of motorcycle restoration advice. Engaging with these communities not only supplements your knowledge but connects you with seasoned restorers willing to share insights. Explore workshops or tutorials that offer hands-on learning opportunities. Embracing a meticulous approach intertwined with community support paves the way for restoration success.
Understanding the Importance of Paint Selection
Paint selection for vintage motorcycles plays a critical role in their aesthetic appeal and overall value. Choosing the right paint can enhance the uniqueness of a classic ride, turning it into a piece of art. For vintage British motorcycle restoration, the significance of paint choice extends beyond just appearance—it’s about preserving historical integrity and ensuring authenticity.
When selecting paint, consider factors such as durability and longevity. High-quality paints are essential to withstand the rigours of riding and environmental exposure. Opting for paints with a durable finish ensures that your motorcycle remains vibrant and protected over time.
Compatibility with various motorcycle materials and finishes is another vital aspect. Different components, such as metal and plastic, require specific paint types to ensure proper adhesion and finish quality. Misaligned paint can lead to peeling or chipping, diminishing the bike’s aesthetic and monetary worth.
Thus, the paint selection process should balance aesthetic appeal, durability, and material compatibility—ensuring that your vintage motorcycle not only looks stunning but retains its value for years to come.
Types of Paint Suitable for Vintage Motorcycles
Restoring a vintage motorcycle requires careful selection of paint. Understanding the different types of paint for a motorcycle respray can help you achieve a finish that suits the classic style.
Acrylic vs. Enamel Paints
Acrylic and enamel are common automotive paint options. Acrylic paints are water-based, making them easy to apply and capable of a brilliant gloss finish. However, they are less durable compared to enamels. Enamel paints, on the other hand, offer a tougher finish, which is ideal for the resilient requirements of vintage bikes. They dry harder and are resistant to external weather conditions but may be more challenging to apply due to longer drying times.
Urethane Paints
Urethane paints stand out as the best paint for vintage bikes due to their durability and UV resistance. They provide a modern finish with a robust protective layer. While they offer excellent longevity, urethane paints require specific application skills, including the use of suitable protective gear due to their chemicals.
Specialty Motorcycle Paints
Specialty paints are formulated specifically for motorcycles, offering unique colours and finishes that are true to the era. These often entail combinations of base coats and clear coats to achieve depth and richness in colour, requiring meticulous application techniques. Consider these options for a professional restoration outcome.
Choosing the Right Color for Your Motorcycle
When it comes to color selection for motorcycles, especially vintage models, the hue you choose can significantly impact the overall aesthetic and historical authenticity. Vintage British motorcycles, for instance, often employed specific color schemes that have become iconic over time. Understanding the historical significance of these colors can guide your choice if you aim to enhance your bike’s vintage appeal.
In vintage motorcycle color schemes, colours like British Racing Green, deep reds, and classic black were synonymous with the style and performance of the era. These colours not only reflect the design ethos of their time but also convey a sense of prestige and tradition.
For a more personalised approach, custom paint choices allow you to tailor the appearance of your motorcycle while remaining faithful to its vintage roots. One method is to seek inspiration from original designs, which can offer unique ideas on colour matching. This approach ensures that your custom colour scheme respects the legacy of the original motorcycle design while allowing for modern creativity.
Tips for Selecting Colors:
- Consider the bike’s original era and use similar tones.
- Balance vibrant and subdued hues for visual interest.
- Use historical references as inspiration but add a personal twist.
Preparation Techniques for a Smooth Respray
Preparation plays a crucial role in achieving a quality finish for a motorcycle paint respray. Ensuring the surface is well-prepared will contribute to a seamless, durable appearance.
Cleaning the Surface
Before undertaking any sanding or priming, a thorough cleaning is essential. Dirt, grease, and old paint can hinder the adhesion of new paint. Begin by washing the motorcycle with warm, soapy water. A degreaser can be used for areas with stubborn grime. Rinse thoroughly and allow to dry completely before proceeding.
Sanding and Priming
Sanding is a critical step in surface prep techniques. It helps smooth out the existing paint layers and creates a slightly roughened texture for primer adherence. Start with a coarser grit sandpaper (around 320 grit) and move to a finer one (such as 600 grit) for a smoother result. Once sanded, apply a quality primer, following the manufacturer’s instructions for the best results.
Dealing with Rust and Imperfections
Addressing rust and imperfections upfront is key to a flawless base. Use a rust remover or sand these areas well before applying primer. If there are dents or other flaws, use filler to level the surface, sanding it smooth afterward. Recommended tools include sanding blocks, electric sanders, and rust removers to aid in effective preparation.
Application Methods for Painting
Understanding various painting methods for motorcycles is crucial for achieving a professional finish. The most common techniques include spray painting, brush, and airbrush, each offering unique advantages and challenges. Let’s explore these methods and highlight best practices.
Spray Painting Techniques
Spray painting is often favoured for its ability to cover large areas quickly and evenly. It provides a smooth finish, ideal for motorcycles. However, achieving a professional finish requires practice and precision. Ensure the environment is dust-free and the temperature is moderate to prevent uneven drying or patches.
Brush Painting
Using a brush is less common but can be effective for intricate detailing. The downside is the potential for visible strokes. To combat this, use high-quality brushes and ensure the paint consistency is just right, neither too thick nor too runny.
Airbrush Application
An airbrush allows for precise control, perfect for detailed artwork or gradients. To master this technique, practice controlling the air pressure and paint flow. Achieving a durable coat involves using multiple thin layers rather than one thick coat, preventing runs and ensuring longevity.
Ultimately, choosing the right method depends on the desired outcome, available equipment, and personal skill level.
Finishing Touches and Protection
When it comes to motorcycle paint, ensuring your bike maintains its pristine appearance is crucial. One way to achieve this is through applying a clear coat. Clear coats act as protective finishes for motorcycle paint, providing a barrier against environmental elements like UV rays, dirt, and moisture. This extra layer of protection is essential, especially for those looking to maintain a vintage bike’s appearance.
Clear Coats and Finishes
Clear coats enhance the paint beneath, offering not just protection but also a glossy finish that highlights your motorcycle’s details. It’s crucial to choose a high-quality clear coat tailored to withstand outdoor conditions. Applying several thin layers can significantly fortify the paint, ensuring longevity.
Waxing and Protection Tips
For additional protection, waxing plays a pivotal role. Wax adds a hydrophobic layer, repelling water and reducing potential damage. A regular waxing routine, ideally every few months, helps preserve the vintage look while maintaining the paint’s durability. Use wax specifically designed for motorcycles for optimal results.
Long-term Maintenance Strategies
In addition to a clear coat and waxing, implementing an efficient maintenance routine is essential. Regular washing, inspection for paint chips, and using recommended products ensures the paint is sealed efficiently, protecting against degradation. Embracing these strategies not only preserves the aesthetic but extends the life of your motorcycle’s paintwork.
Resources for Sourcing Quality Paints and Supplies
Selecting the right motorcycle paint is crucial for achieving professional results. Several recommended suppliers specialise in quality motorcycle paints. Companies like House of Kolor, ColorRite, and PPG are known for providing exceptional OEM color matches and finishes. Investing in these reputable brands ensures both durability and aesthetic appeal.
When considering where to buy motorcycle paint, it’s essential to examine both physical stores and online outlets. Many paint suppliers offer a comprehensive range of products online, enabling easy comparison of colors and finishes. Websites like Amazon and RevZilla provide customer reviews that can guide your choices. Cross-referencing these reviews with professional opinions helps ensure satisfactory results.
For those embracing a DIY approach, numerous online resources and communities offer valuable advice. Websites like Reddit and forums such as Paint Your Ride enable enthusiasts to exchange tips and experiences.
Here are a few tips:
- Always request color samples before purchasing
- Compare against your motorcycle to ensure accuracy
Engaging with these communities and leveraging their expertise will provide invaluable guidance for achieving a stellar paint job.
Preserving Vintage Integrity While Painting
When it comes to vintage motorcycle preservation, ensuring that painting efforts honour the bike’s original character is crucial. The careful selection of paint can maintain vintage authenticity while enhancing the motorcycle’s appeal. To achieve this, one must consider colour schemes true to the era of the motorcycle, alongside appropriate finishes or coatings that were originally used. This subtle touch not only aligns with historical accuracy but enhances the bike’s ethical resale value.
A delicate balance between restoration and customization is key. Restorative efforts should aim to rejuvenate the motorcycle without compromising its authentic feel. Customizations, however tempting, should be carefully considered for how they might affect the motorcycle’s historical significance. Painting a vintage motorcycle with modern patterns or colours may risk diminishing its authenticity.
The impact of paint selection extends beyond mere aesthetics—it’s deeply tied to the motorcycle’s historical value and resale potential. Choosing the appropriate paint can enhance the motorcycle’s market value and allure for collectors. Thus, it is vital to balance restoration with intelligent choices that respect the era and essence of the vintage motorcycle, ensuring its enduring appeal and ethical resale value.